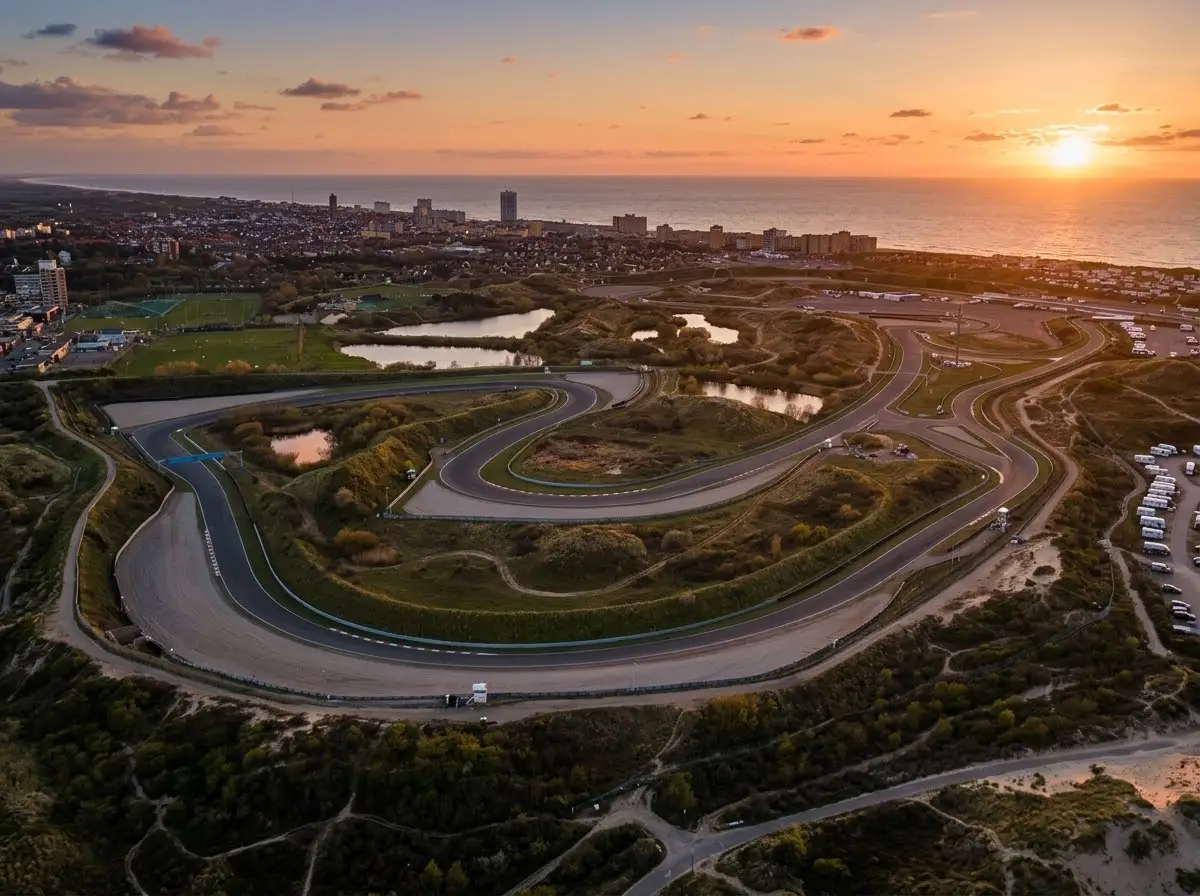
Learn Zandvoort Circuit before your track day with this guide to its corner sequence, blind approaches and changing gradients. Follow a cockpit reference lap in your browser, then revisit Tarzanbocht, Hugenholtzbocht and Scheivlak at your own pace. Drive the Zandvoort lap on your phone, tablet or desktop, with no racing game or sim rig to install.
About Zandvoort Circuit
Circuit Zandvoort sits among the coastal dunes of the Netherlands. The modern Grand Prix layout is 4.259 km (approximately 2.65 miles) long, with 14 turns. Its combination of crests, corners with limited forward visibility and banked bends gives you plenty to learn before a first visit.
The track opened in 1948, and several of its best-known corner names have been part of its history for decades. The circuit has also changed substantially over time, including the reconstruction of Hugenholtzbocht and the final Arie Luyendykbocht into steeply banked corners in 2020.
For track-day preparation, the most useful goal is recognising what comes next. A familiar corner name is only a starting point: you also need to understand how the approach looks from the cockpit and where the exit becomes visible.
Understanding the Zandvoort layout
The lap begins with the right-hand Tarzanbocht after the main straight. Gerlachbocht and the left-hand Hugenholtzbocht follow, before the route climbs into the dune section through Hunserug and Slotemakerbocht towards Scheivlak.
The middle of the lap takes you through Mastersbocht, Turn 9 and Turn 10. The Hans Ernst chicane changes the rhythm again, before the closing right-hand bends return you to the main straight.
Learn these as three connected sections: the opening corners, the dune section, and the technical middle leading into the final banking. It is easier to build a mental map this way than to memorise every corner at once.
Corner labels vary between older maps, simulator models and current venue information. For example, a viewer may label Turn 13 as Kumhobocht. Use the sequence and corner number as well as the name, and check the official Zandvoort corner guide for the real circuit.
How to learn Zandvoort before you go
You can start learning Zandvoort without owning a simulator or visiting the circuit. ApexGuide’s browser lap viewer lets you follow the route from the cockpit and review the reference line and corner information in short sessions.
Open Drive the Zandvoort lap and try this routine:
- Watch the full lap first. Notice the changes in height and how frequently one corner leads into another.
- Learn the main landmarks. Start with Tarzanbocht, Hugenholtzbocht, Scheivlak and the Hans Ernst chicane.
- Revisit the blind approaches. Watch when the next section becomes visible instead of relying only on the map.
- Connect the exits and entries. Follow where leaving one bend places the car for the next.
- Refresh the unfamiliar sections. Before travelling, review the parts you still find difficult to recognise.
The viewer’s reference lap is simulated. Its speeds and braking points are not targets for your first session, and the model may differ from the current venue, particularly where banking, kerbs or run-off areas have changed. Use it for layout familiarity, then follow the real circuit’s briefing and sighting laps.
Zandvoort corner by corner
These notes follow the main named sections of the lap. Some combine multiple bends, so the number of guide headings does not equal the official turn count.
Tarzanbocht
Tarzanbocht is the right-hand hairpin at the end of the main straight. Watch the whole turn, including how long the car remains committed to the corner before the exit opens. Begin with a comfortable braking margin and avoid turning in so early that you leave yourself little room for the remainder.
Gerlachbocht
Gerlachbocht follows quickly and gives you a limited view of its exit on approach. Study its connection to the next left rather than treating it as an isolated bend. The useful preparation is recognising the sequence early enough that you are not still working out the route while trying to position the car.
Hugenholtzbocht
Hugenholtzbocht is the tight left-hand turn before the climb into the dunes. On the modern circuit, its steep banking changes the shape and feel of the corner. Do not assume an older reference line shows the best route for the current surface or your vehicle; use the briefing and instruction to understand the available lines.
Hunserug
Hunserug forms part of the rising section beyond Hugenholtzbocht. Follow the road’s changes in direction and height, paying attention to what is visible beyond each rise. It is tempting to focus on acceleration here, but learning the approach to the next section is more useful on your first laps.
Slotemakerbocht
Slotemakerbocht leads towards Scheivlak, with the terrain limiting your view ahead. Watch the complete transition so you understand where the car is heading before the next corner becomes obvious. Leave yourself time to recognise the road rather than adding speed into a section you cannot yet confidently anticipate.
Scheivlak
Scheivlak is the right-hand bend that drops away through the dune section. The approach and falling road deserve repeated study because a flat map cannot show what the cockpit view hides. Build familiarity at a manageable pace and concentrate on identifying the exit before trying to carry more speed through the corner.
Mastersbocht
Mastersbocht follows Scheivlak and brings you into the next part of the lap. Watch how the previous exit affects your approach to this right-hander. Avoid assuming the flowing dune section continues unchanged: reset your attention for the sequence ahead instead of carrying expectations from the corner you have just completed.
Turn 9
Turn 9 is a tighter right in the middle section. Study the amount of turning required and where its exit places you for Turn 10. A controlled entry gives you time to understand both corners, while arriving too quickly can make the following change of direction feel unnecessarily rushed.
Turn 10
The left at Turn 10 follows the preceding right and sets up the run towards the Hans Ernst chicane. Think about the pair together rather than chasing the first available apex. Watch when the car has finished turning and how the road opens before deciding how quickly to accelerate away.
Hans Ernst chicane
The right-left Hans Ernst chicane interrupts the run towards the final section. Follow both direction changes in the viewer, including the space needed to finish the second part. Allow enough braking margin to arrive settled, and avoid prioritising the first apex at the expense of the rest of the sequence.
Turn 13, Kumhobocht
This right-hander leads towards the final corner and may appear as Kumhobocht in the viewer. Keep watching the remaining curvature rather than looking prematurely down the main straight. Your position through this section influences the approach to the final bend, so treat the two as connected.
Arie Luyendykbocht
The final right returns you to the main straight. The modern circuit’s steep banking makes this a distinctive part of the lap, but it does not make every line or speed suitable for every car. Complete the corner at a pace you understand, with instruction guiding how you use the banked surface.
First track day at Zandvoort: practical tips
Check the exact event arrangements. Follow the organiser’s joining instructions for access, signing on, briefing times, equipment and noise requirements. Do not borrow a limit or timetable from a different event.
Use sighting laps to check the real venue. Identify pit entry, marshal posts and any restrictions. Compare the track with the model you studied, particularly at the banked corners and anywhere the kerbs or run-off differ.
Build confidence through recognition. An early goal is to know what comes next without hesitation. Leave more margin where the road disappears over a crest or the exit is hidden.
Reassess changing grip. Adjust your pace for damp patches, rain or other changes in the surface. A comfortable reference from an earlier session may need revising.
Ask for targeted instruction. Explain whether Scheivlak’s approach, the banking or a particular corner connection is causing uncertainty. Work on one section at a time and follow the event’s overtaking rules.
Frequently asked questions
Can I learn Zandvoort without a simulator or video game?
Yes. ApexGuide lets you follow a Zandvoort reference lap in your phone, tablet or desktop browser without buying a racing game or owning a sim rig. You can learn the sequence and recognise approaches before visiting. Use that familiarity alongside the briefing, sighting laps and instruction at the real circuit.
Is the ApexGuide Zandvoort simulator free?
Yes. ApexGuide’s Zandvoort browser lap viewer is free to use, with a free account required to continue exploring certain features and tracks. No separate racing game or specialist controller is needed. The viewer helps you study the circuit’s reference lap and prepare questions about the sections you find difficult.
How long is Zandvoort Circuit?
The modern Zandvoort Grand Prix circuit is 4.259 km long, approximately 2.65 miles, with 14 turns. Older layouts and simulator measurements can differ, so check which configuration your event uses. A lap viewer may also group several bends into one named section rather than display every official turn separately.
Which corners at Zandvoort are banked?
The modern circuit’s two prominent steeply banked corners are Hugenholtzbocht and the final Arie Luyendykbocht, both extensively changed in 2020. Banking affects the possible lines and how the vehicle feels through the corner. Learn the current layout with your instructor rather than assuming an older simulator model or another driver’s line applies directly.
Where should I brake at Zandvoort?
There is no universal set of braking points for Zandvoort. Your vehicle, tyres, approach speed, experience and conditions all affect where you need to slow down. Use the reference lap to recognise the approaches, particularly Tarzanbocht and the Hans Ernst chicane, then begin conservatively and establish suitable references with an instructor.
Is Zandvoort suitable for a first track day?
Zandvoort can be an option if the organiser welcomes beginners and offers a format suited to your experience. Its blind approaches, changing gradients and banking reward patient preparation. Learn the sequence beforehand, follow the briefing and use instruction where available, with recognising the circuit as your first goal rather than matching a reference speed.
Does the Zandvoort simulator show the current circuit exactly?
A simulator model should not be assumed to reproduce every current circuit detail. Zandvoort has changed over time, particularly at its banked corners, and surfaces, barriers or run-off areas may differ from the reference model. Use the viewer to learn the route, then check the real venue during your briefing and sighting laps.
What is the hardest corner at Zandvoort?
Different sections challenge different drivers. Scheivlak combines a limited view on approach with a falling right-hand bend, while the banking and connected middle-section corners demand different judgements. Review whichever part you find hardest to anticipate and discuss it with an instructor who can relate the advice to your vehicle and the conditions.